Archive
Mounting shared Linux disk from inside windows in VirtualBox
Just as a reminder:
- use the disk sharing icon at the bottom of he VirtualBox window to setup a shared directory (let’s say you give it a name of “shareddir”)
- go inside the VirtualBox window
- if you haven’t installed the VirtualBox Guest Additions (commonly referred to as GA), please do so from the “Devices” menu of your Virtual Box window
- open a terminal (Execute cmd)
- type “net use x: \\vboxsrv\shareddir”
Seldom, this might still trigger a
System error 67 has occured. The network name cannot be found
In this case, you can use another technique: My Computer -> Network Places -> Add a network place -> Next -> Next -> Browse -> Entire Network (+ sign) -> VirtualBox Shared Folders (+ sign) -> \\VBOXSRV\shareddir -> OK -> Next -> give a name -> Next -> Finish
Tener una mejor resolución para Ubuntu en VirtualBox
Solo es un enlace: http://www.linuxformat.co.uk/forums/viewtopic.php?t=6438
Para evitar perder la información, como ya nos ha ocurrido bastante, repetimos el contenido aquí:
1. Start Virtual box and log into Ubuntu.
2. Hit the right ctrl key so you can get your mouse pointer outside the virtual machine.
3.Go to top of virtual window, click on devices then select “Install Guest Additions”
You will see a window pop up inside Ubuntu showing you that there are some new files mounted in a virtual CDROM drive. One of those files should be VBoxLinuxAdditions.runYou must run the file with some admin permissions so do that this way…
4. Click inside the Ubuntu screen again then go to Applications – Accessories then Terminal. The terminal window is where you will run the file from, but first we must navigate to the correct directory.
5. type this… cd /media/cdrom0 (then hit enter, there is a space after cd!)
6. next type… dir (You should see amongst the files displayed VBoxLinuxAdditions.run)
7. now type… sudo sh ./VBoxLinuxAdditions.run (yes, that is a full stop before the slash!)
after you hit enter and it has done its stuff, the files are now accessable from Ubuntu.
8. You now need to reboot the virtual machine or press Ctrl+Alt+backspace.
9. Log onto the Ubuntu desktop and this time go to System – Preferences then Screen Resolution. You should now have more options than the three low res options you had at the beginning of the day!
Debería dar buenos resultados de frente (probado con Ubuntu 8.04 en VirtualBox bajo Ubuntu 9.10)
VirtualBox
VirtualBox (http://www.virtualbox.org/) un logiciel libre basé sur Qemu (http://www.nongnu.org/qemu/)[1] et édité par la société Innotek (rachetée récemment par Sun), est un excellent outil pour virtualiser des stations de travail sur une station de travail[2].
Non content d’être très fluide, il tourne sous Windows, GNU/Linux et (Open)Solaris[3].
Il en existe une version libre (VirtualBox Open Source Edition aka OSE) et une autre, propriétaire, offrant plus de fonctionnalités (surtout au niveau du hardware émulé).
La version OSE est disponible dans toutes les bonnes distributions GNU/Linux, tandis que la version de Sun n’est disponible que depuis leur site. Ils fournissent même des sources APT[4] pour qu’il soit facile de l’installer sur une Debian ou dérivée.
Attention cependant, la version OSE utilise aussi des fichiers de configuration des machines virtuelles dans une version nettement plus ancienne que celle du VirtualBox propriétaire. VirtualBox proposera au démarrage d’upgrader le format s’il y a lieu.
Crear carpetas compartidas con VirtualBox
Esta opción es muy útil si deseamos compartir una o más carpetas entre Ubuntu con el sistema operativo que tengamos instalado el nuestro VirtualBox, para este ejemplo Windows XP.
Primero debemos tener instaladas las Guest Additions, para ello iniciamos “Windows XP / dispositivos / Instalar “Guest Additions”(sistema de huésped)”. Luego vamos a compartir una carpeta. Aconsejo que en nuestra carpeta personal haya una que sirva de intercambio con otros sistemas (reales o virtuales). Yo por ejemplo la he llamado “darkvela_comparte“.
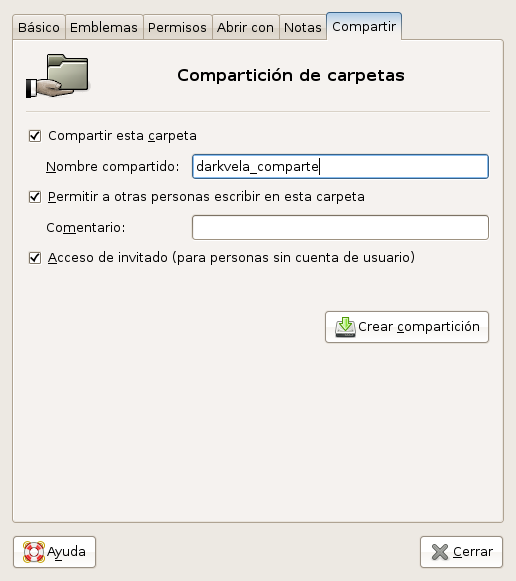
Aconsejo también ubicar la carpeta personal dentro del directorio home (carpeta personal). Hacemos botón derecho sobre ella, pulsamos “Propiedades” y vamos a la pestaña “Compartir”. Habilitamos la primera casilla “Compartir esta carpeta” y si es la primera vez nos dirá que el servicio no está instalado, le decimos que sí, introducimos nuestra contraseña (si tiene nivel de sudo) y lo instalará. Seguidamente habilitamos las otras dos casillas si nos interesa, no necesitan explicación: “Permitir a otras personas escribir en esta carpeta” y “Acceso de invitado (para personas sin cuenta de usuario)“. Finalmente le damos al botón “Crear compartición“.

Compartir carpetas Imagen 1
Bien, compartida la carpeta vamos a hacer que nuestro Windows pueda acceder a ella y para ello tenemos que prepararlo por ambos lado (Ubuntu y Windows). Empezando por la primera, con la máquina apagada (VirtualBox) vamos a “Configuración > Directorios compartidos” y a la derecha le damos al icono de la carpeta con un símbolo de suma. Se nos abre una nueva ventana donde buscaremos y seleccionaremos la carpeta compartida (en mi ejemplo /home/darkvela_comparte), le ponemos de nombre el que queramos, yo dejaré “darkvela_comparte” y la casilla de “Read-only” (sólo lectura) la habilitaremos si no vamos a escribir en ella desde la máquina virtual, en caso contrario la dejamos deshaiblitada. Le damos a “OK” y listo.
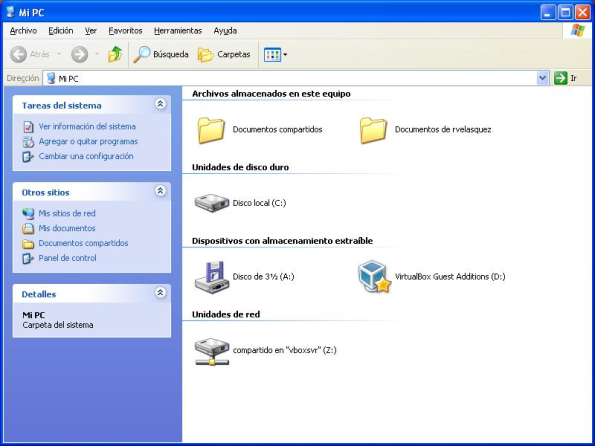
Finalmente iniciamos Windows XP, abrimos una consola de Windows (cmd) y escribimos lo siguiente:”net use Z: \\vboxsvr\darkvela_comparte”
Ojo: Debemos seleccionar una unidad que no esté ocupada por otro dispositivo, para ete ejemplo “Z” y también tener en cuenta el espacio entre “Z:” y “\\”.

Compartir carptetas Imagen Final
VirtualBox and Ubuntu packages
VirtualBox is a very practical application running under Linux systems, and packaged into Ubuntu 8.04 Hardy Heron, that lets you virtualise an operating system. A bit in the same way as QEmu did it, except that, to make it short, it works better.
Anyway, VirtualBox is highly dependent on the kernel of the base system you’re running it on, so it is linked to the kernel packages in Ubuntu. The only problem is that, when upgrading your kernel with the usual Ubuntu package updates, you don’t get an update for the VirtualBox right away. Instead, you will have to wait for a few days, and possibly a few weeks. The recommendation is thus: do not upgrade your kernel if you
- really need VirtualBox
- don’t really need the upgrade
- don’t know for sure if there is a new VirtualBox package for that kernel
You can always start your system withn older kernel later on (if you didn’t clean the older versions), but then what’s the use of upgrading?
To give you a rough idea, to date, the latest kernel package is linux-image-2.6.24-19-*, and the latest VirtualBox kernel-dependent package is virtualbox-ose-modules-2.6.24-16-*
